
6 master classes and ideas for autumn crafts for adults and children
Autumn is a great time for handicraft, because it gives us so many beautiful materials: leaves, vegetables, fruits, flowers, acorns, cones and twigs. And how cozy the house becomes if it is decorated with decor in a yellow and crimson scale. In this material you will find 6 ideas for autumn DIY crafts for adults and children with step-by-step master classes and a selection of photos for inspiration.
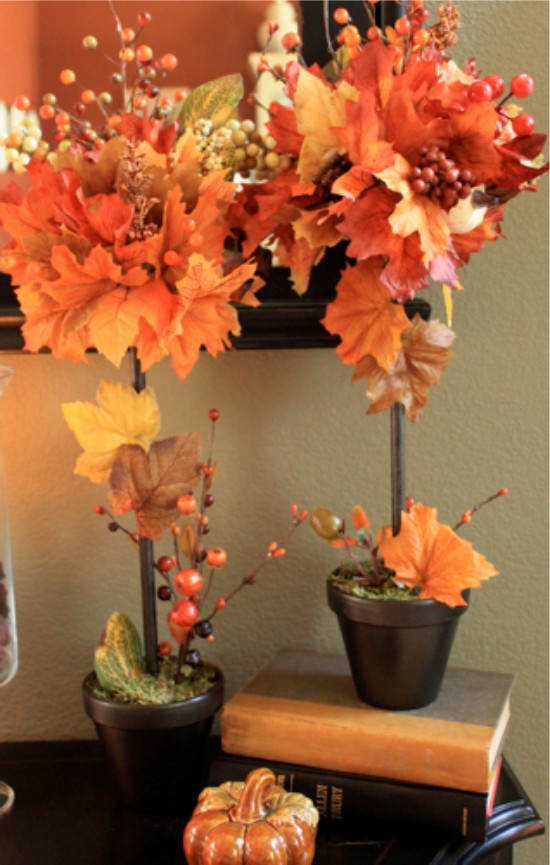
Idea 1. Autumn topiary
Topiary is a decorative tree that can be used to decorate a dining table, a mantelpiece or a space by the front door. To make it, you can use natural or artificial materials, for example: leaves, berries on twigs, acorns, cones, chestnuts, flowers, dried citrus slices, as well as felt, sisal, flax and whatever your imagination tells you. In the next slider, you can see some examples of such autumn crafts..
-
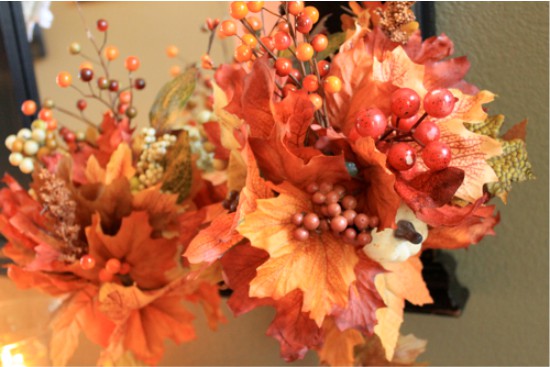
 Autumn topiary made of artificial flowers
 -
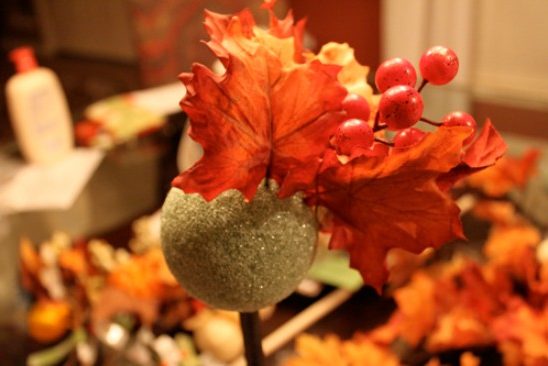
- The crown of this Halloween topiary is framed with green split peas
- Craft from an artificial hydrangea flower
- Craft from artificial autumn leaves
- Topiary of pumpkin, autumn leaves and flowers
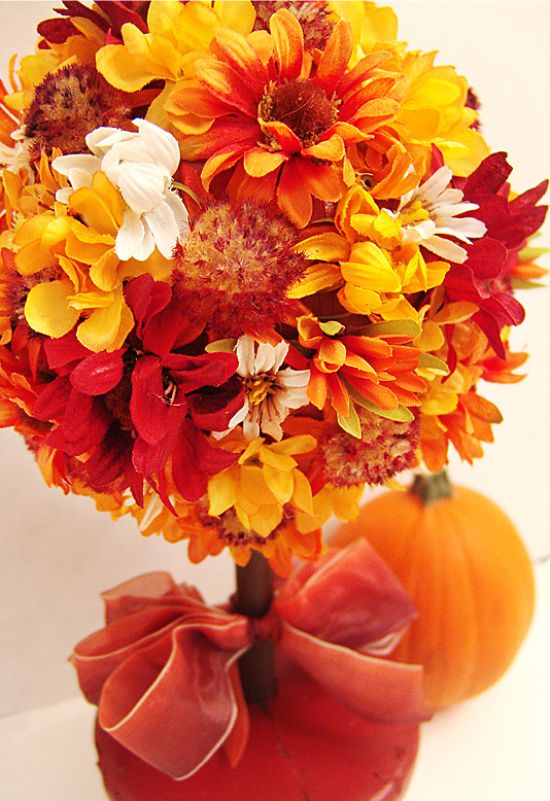 Autumn topiary made of artificial flowers
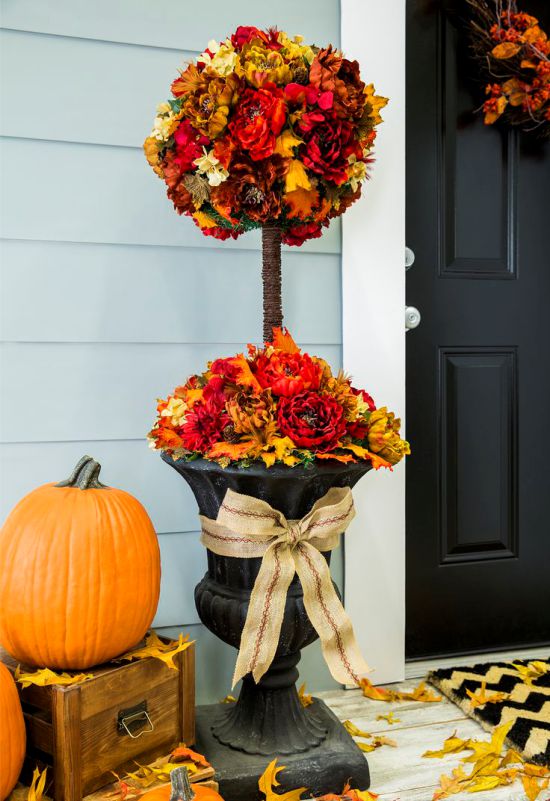
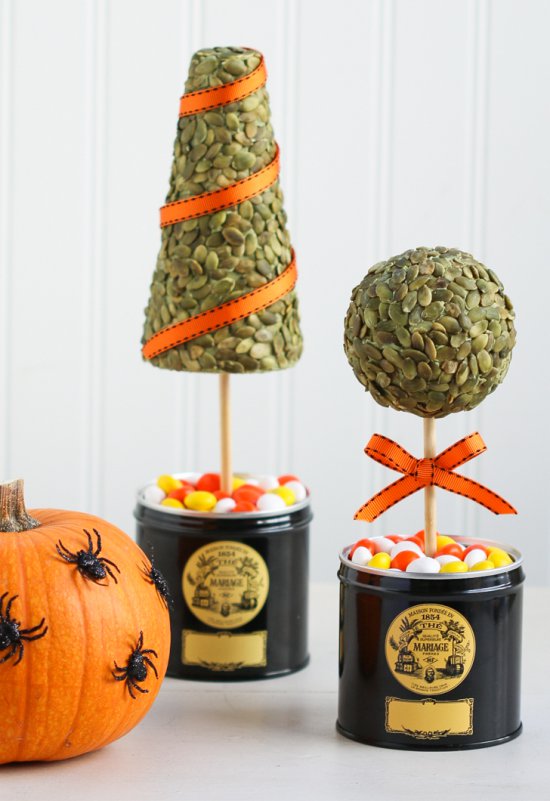 The crown of this Halloween topiary is framed with green split peas
 Craft from an artificial hydrangea flower
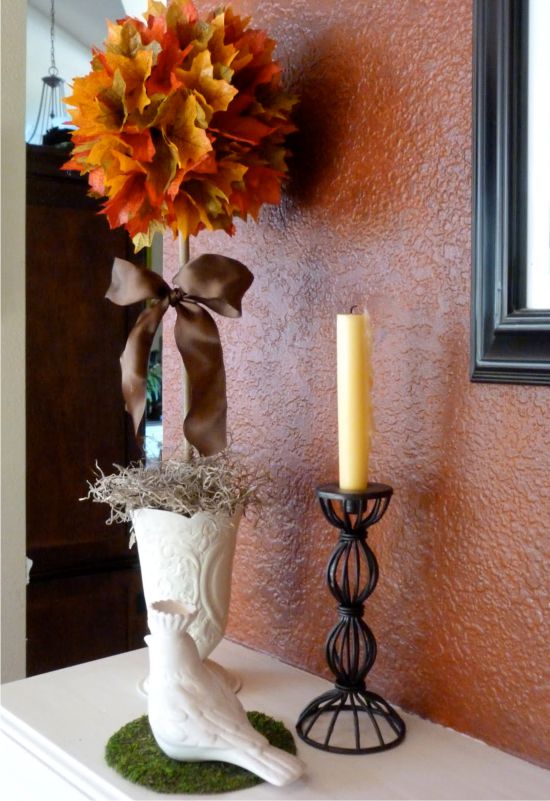 Craft from artificial autumn leaves
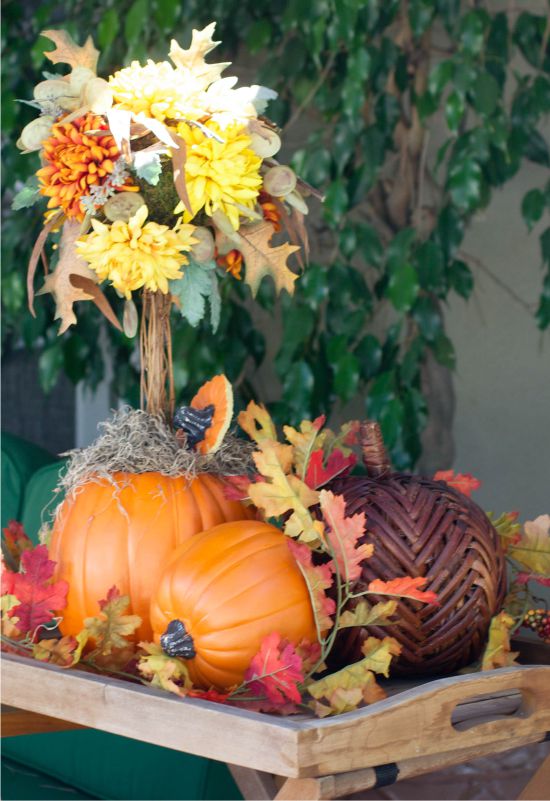 Topiary of pumpkin, autumn leaves and flowers
 Next, we present you a simple master class on making an autumn decorative tree from artificial leaves and berries..
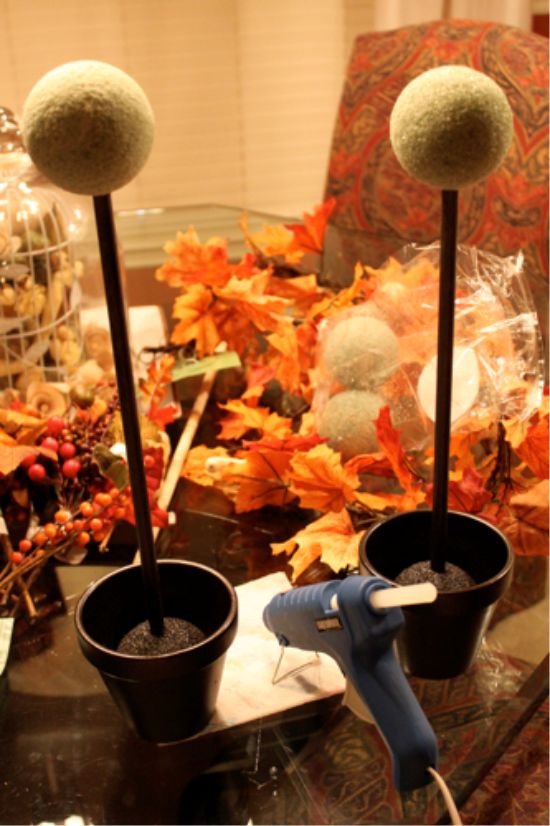
Materials:
- Clay pot;
- Wooden stick or branch;
- Two balls of polystyrene or floral foam;
- Materials for decorating the crown;
- Dry moss (you can replace it with sisal);
- Glue gun and a few sticks of glue;
- Scissors;
- Side cutters or secateurs;
- Acrylic paints for painting the barrel, ball and pot (optional).
Instructions:
Step 1. Cut a hole in the base ball with a sharp object under the barrel about a third of its diameter deep. Put hot glue into the hole and insert the barrel into it.
Step 2. Insert the second ball into the pot. If the balloon does not fit snugly in the pot, place newspaper around it. Cut a hole in the ball for the barrel 2-3 cm deep. Insert the barrel with the crown into the hole and adjust its length. Next, drop the glue into the hole in the ball, place the barrel in it and start filling the hole with glue, placing small pieces of paper around the barrel. This is to prevent the hot glue from deepening the hole too much..
Step 3. Paint the pot in the desired color if you do not like its original appearance. In this project, the pot was painted with spray paint in a shade of dark bronze from Rustoleum (sold in construction stores, for example, in Leroy Merlin).
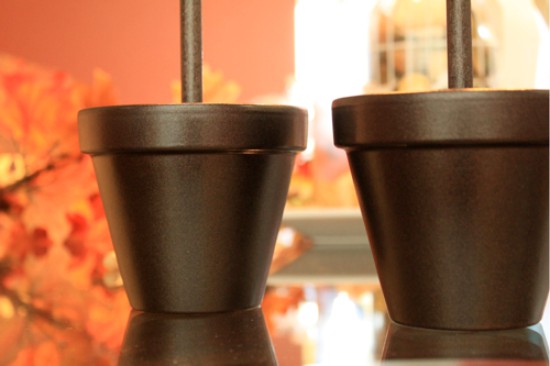
Remember that the design of the pot should be simple and unpretentious so as not to distract attention from the crown. Paint the barrel and / or balls at this stage if necessary. It is advisable to paint the balls so that the gaps between the decorative details are invisible..
Step 4. While the paint on our workpiece is drying, sort the decorative details by type and size. If you use artificial leaves, flowers and berries with a wire base, then, cutting them off, leave “stems” about 2 cm long. This is necessary in order not only to glue the parts, but also to stick them into the ball – then they will hold more securely … If the “stems” do not have a wire, then it is better to cut the details “at the root”.
Step 5. Now it’s time for the fun part – creating the crown. First, evenly distribute and glue the largest parts on the ball, then the medium ones. Finally, fill in the blanks with small embellishments..
Step 6. Well, that’s all, it remains only to decorate the ball in a pot with dry moss or sisal, having previously processed it with glue.
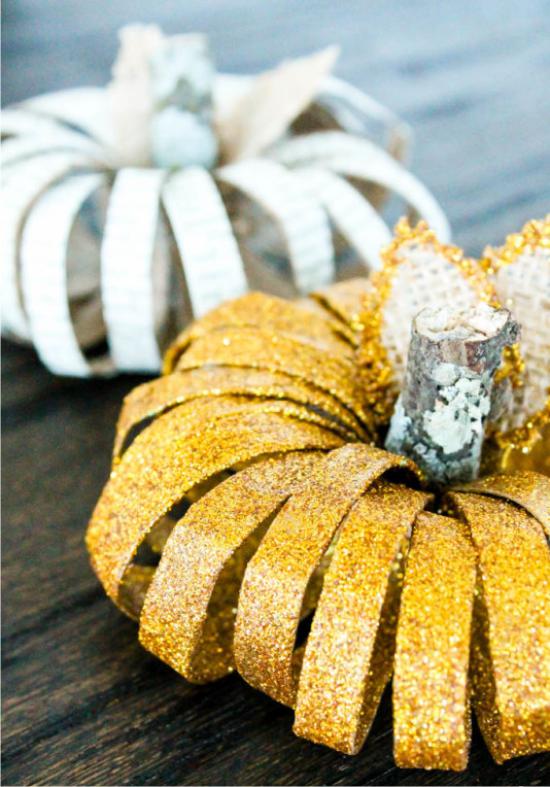
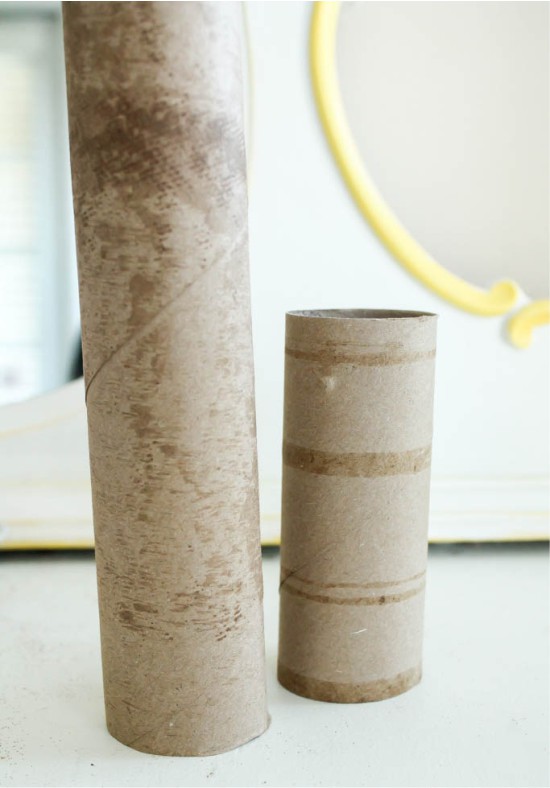
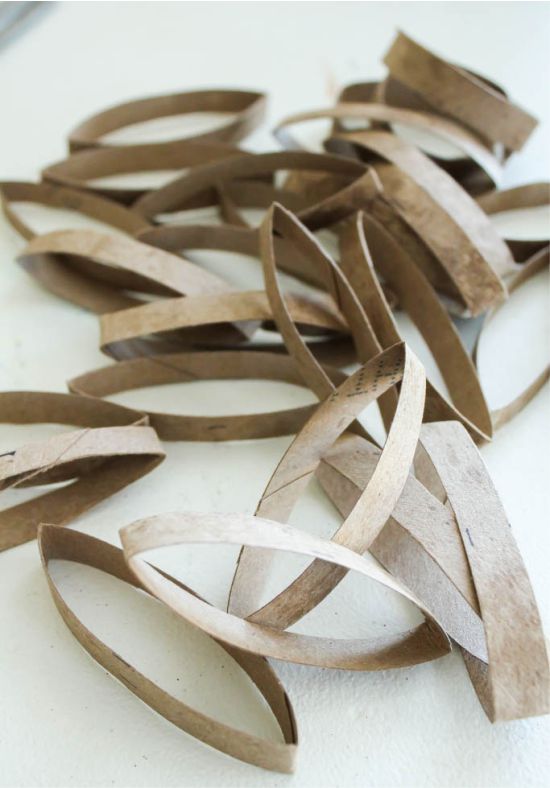
Idea 2. Pumpkins from toilet paper rolls
And here is another idea for an autumn craft on the theme of vegetables, which you can make with children – pumpkins from toilet paper rolls. The possibilities for decorating such crafts are endless. For example, children can use colored paper, gouache or sequins, while adults can use gold leaf, fabric or lace..
Materials:
- Toilet rolls or paper towels;
- Scissors;
- Leg-split;
- For decoration: brushes, gouache or acrylic paints, PVA glue and glitter or book pages, etc.;
- Cinnamon sticks or twigs (to create the core of the vegetable);
- Burlap, felt or cardboard (to create leaves).
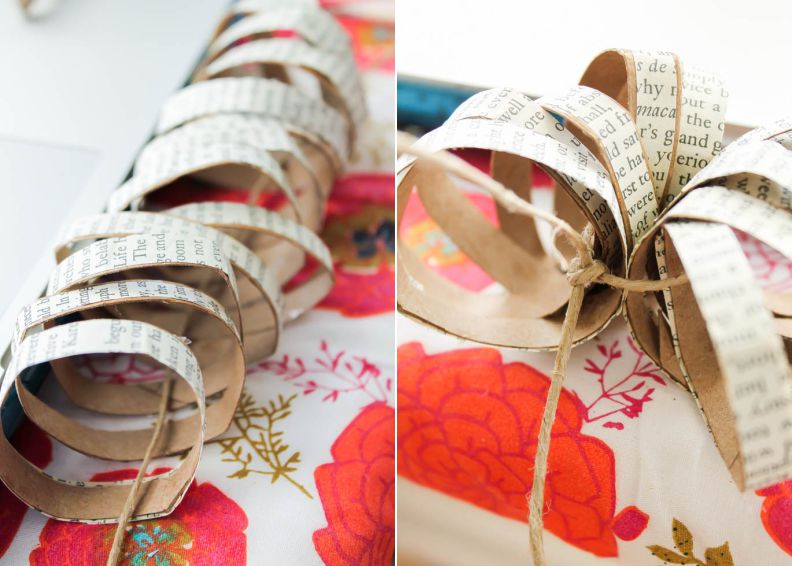
Step 1. Flatten the toilet paper roll and cut into rings.
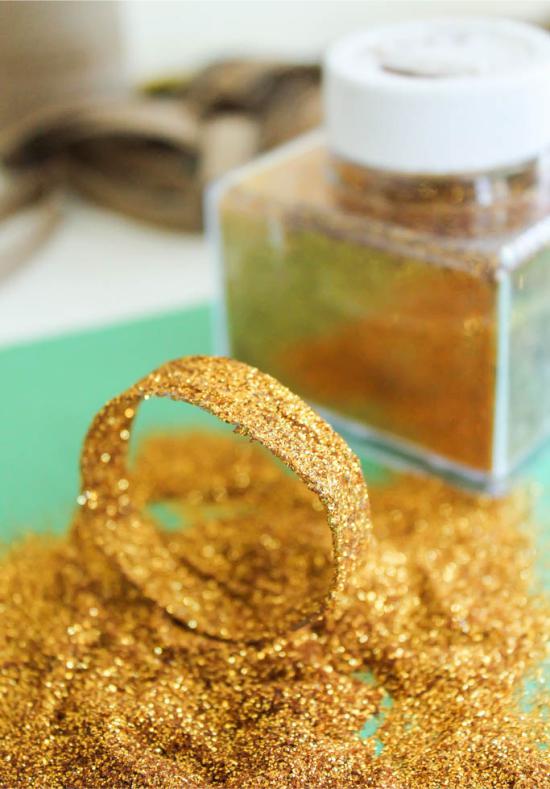
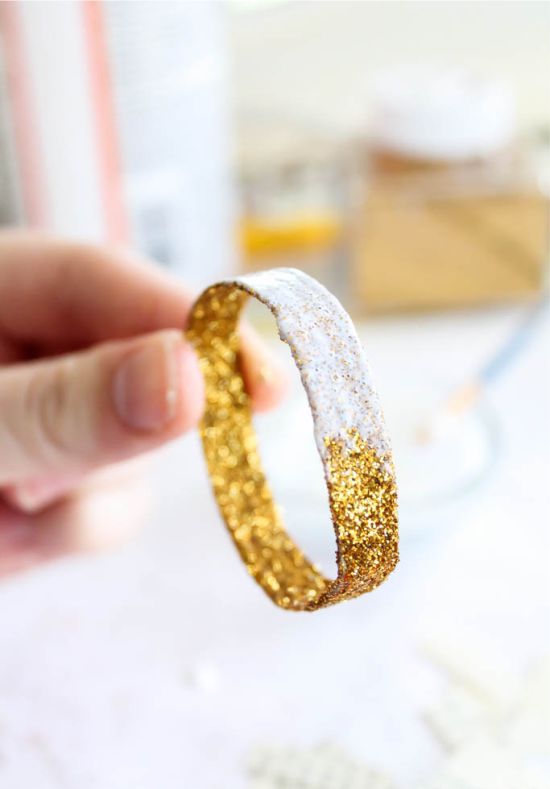
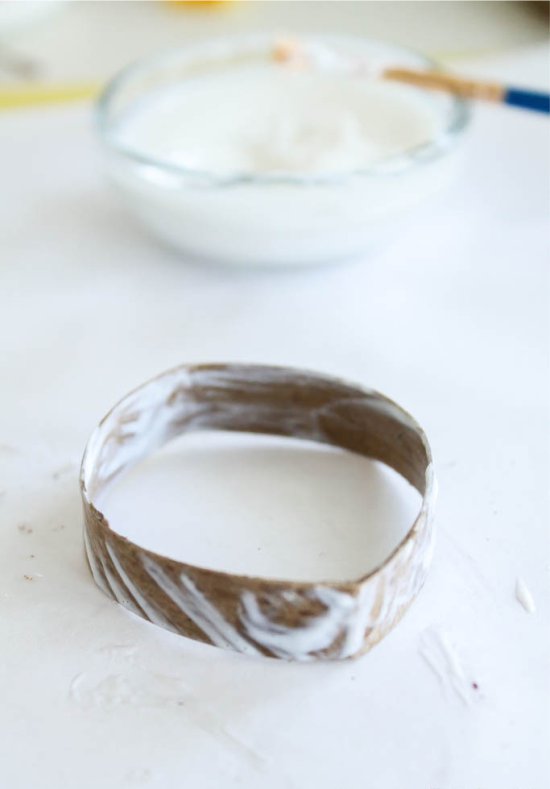
Step 2. Decorate the rings with any material you like, such as kraft paper, scrapbooking paper, cloth, ribbons, or simply paint them with acrylic paint. You can also decorate pumpkins just like in this master class – with sequins and stripes of book pages..
Method 1. Using a brush, brush the outer sides of all rings with PVA glue, and then sprinkle glitter on them liberally. Wait until the workpieces dry, and then cover the glitter with a second layer of PVA glue to protect them from shedding.
Method 2. Cut thin strips of paper from book pages and glue them to the rings with PVA glue or glue stick.

Step 3. To form your pumpkin, pass the string of twine through the rings, then tighten its two ends and tie a knot as shown in the photo.
Forming a pumpkin from rings
Step 4. Now glue cinnamon sticks or cut twigs into the center of the pumpkin.
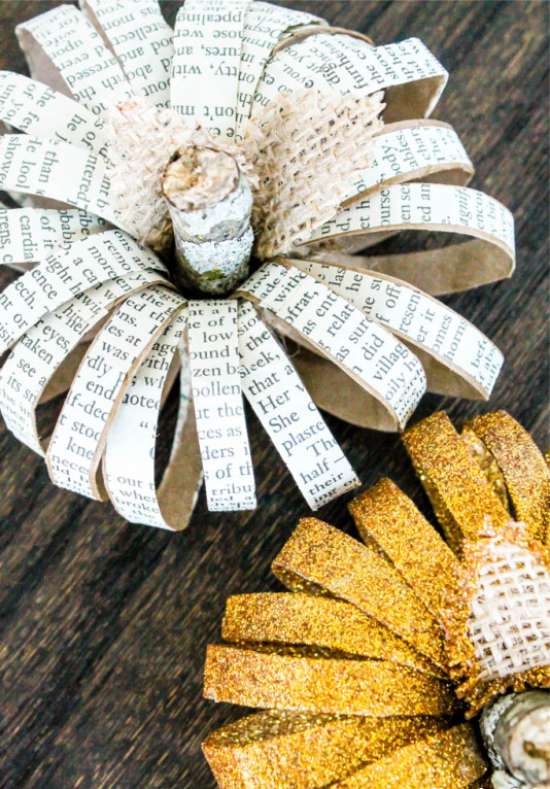
Step 5. Hooray, your pumpkins are almost ready, it remains only to add leaves cut from burlap, felt, cardboard or any other material at hand..

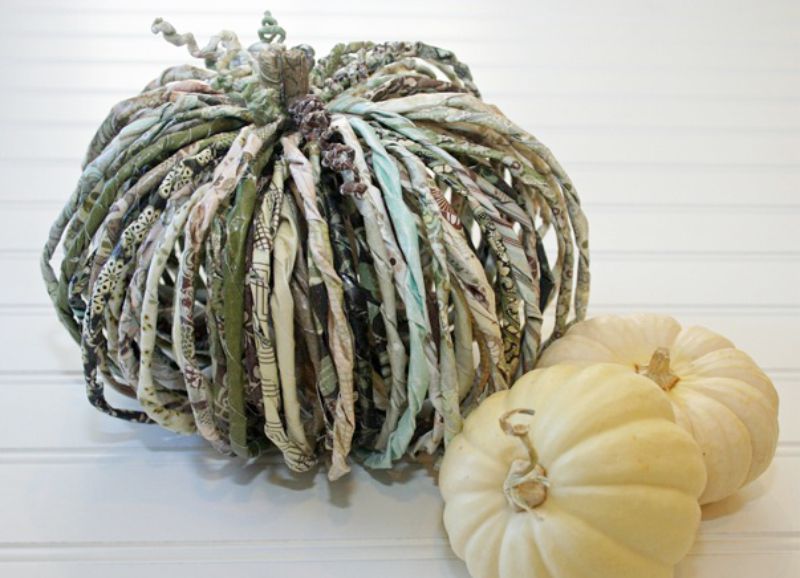
By the same principle, you can make a pumpkin from rings of any material..
-
 Paper ring pumpkin
 - Tin Ring Pumpkin
- Willow Ring Pumpkin
 Paper ring pumpkin
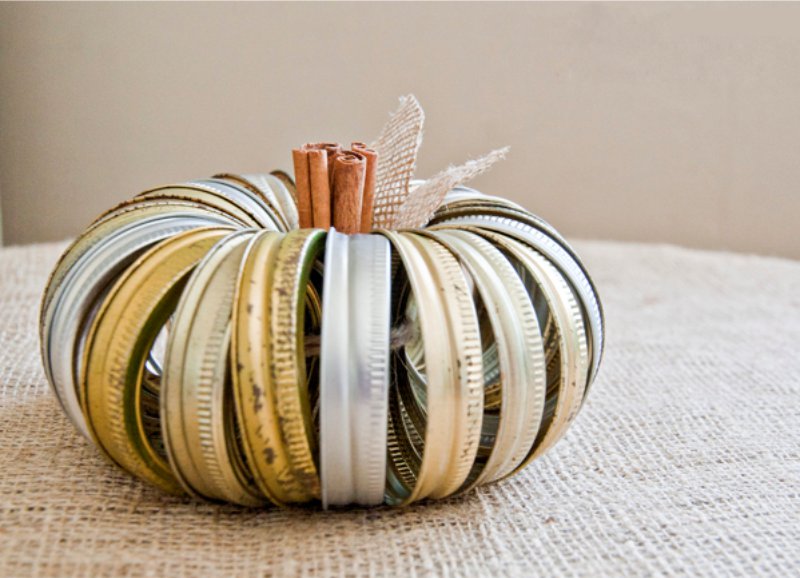 Tin Ring Pumpkin
 Willow Ring Pumpkin
See also the material: DIY paper flowers – 4 master classes for beginners.
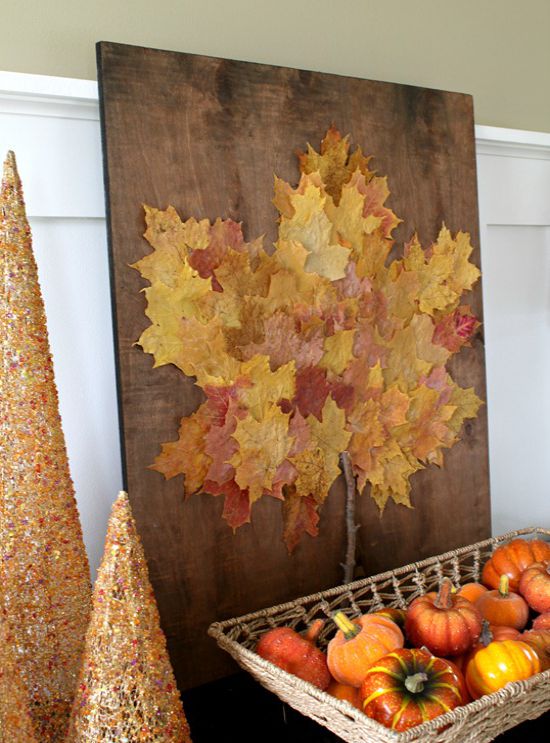
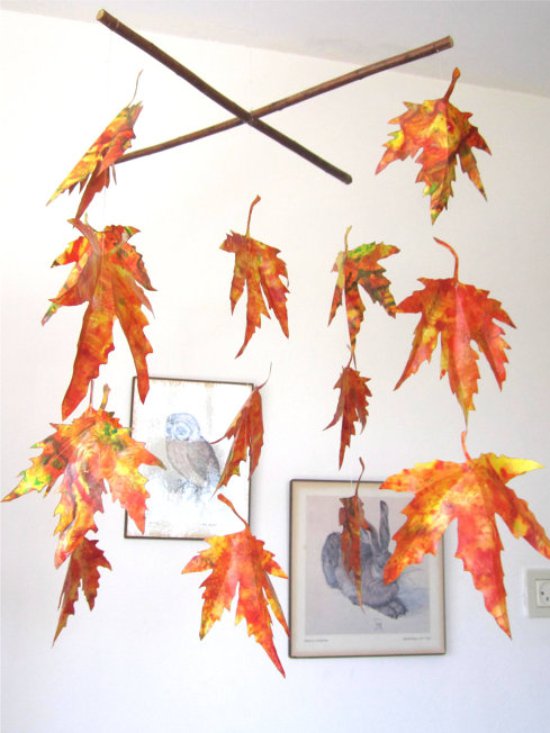
Idea 3. Panel from leaves
Next, we present to you the idea of crafts from autumn leaves. Since hot glue and sharp objects are not used in this master class, you can safely connect children to work, and especially to collect material.
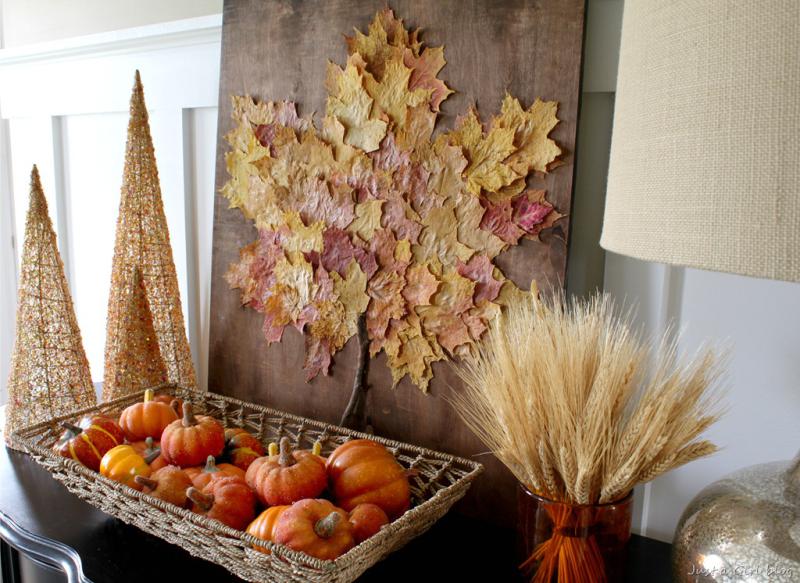
The idea of an autumn craft from natural material that can be made with children and used for seasonal home decoration
Materials:
- Wooden board or thin plywood;
- Pre-dried leaves (for instructions on how to dry leaves and flowers, read at the end of the article);
- Thin twig;
- Stain;
- Brush;
- PVA glue;
- Marker;
- Any heavy object as a press.
Instructions:
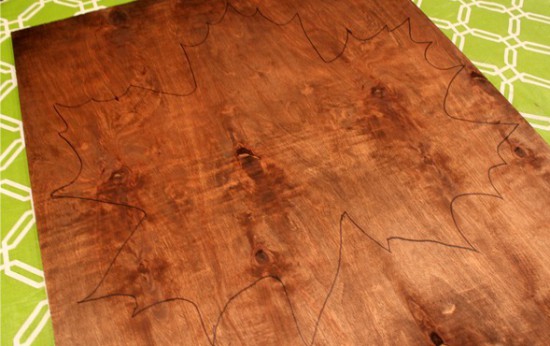
Step 1. Cut the wood with a jigsaw and sand the ends with sandpaper.
Step 2. Paint the board with wood stain and leave to dry.
Step 3. With a marker, draw a maple leaf on the board by hand, using a template or stencil.
Step 4. Begin to glue the pre-dried leaves (see the instructions for drying them at the end of the article) like a fan, trying to place them so that their edges coincide with the outline of the picture. In this case, you should not glue the leaves completely, let their tops be a little free so that the panel gains some volume. On each glued leaf, put a press of a suitable size for a minute.
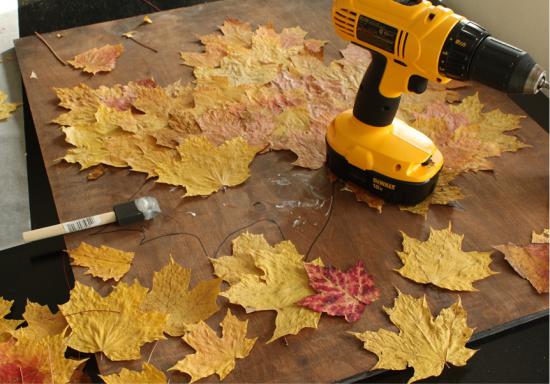
Fixing a leaflet with a press
Keep in mind that the leaves will not adhere immediately, but will stick well after the glue dries..
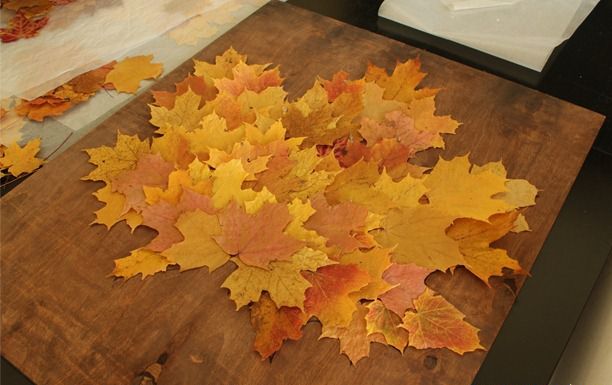
Step 5. To make the contours of the picture clearer, trim the leaves in some places. However, try to use this correction as little as possible so as not to lose the beauty of the natural lines..
Step 6. Now attach a twig to your panel in place of the stem, break off the excess and glue.
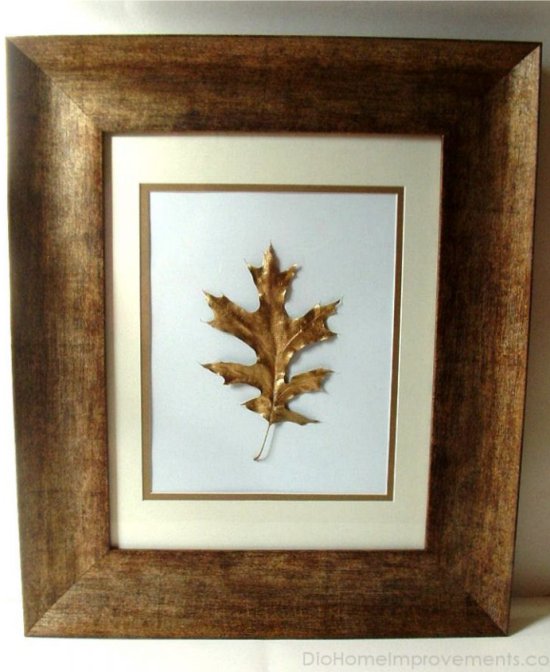
The following selection of photos contains examples of no less original autumn panels..
-
 Dried leaf covered with gold paint in a frame
 - Framed leaves on glass
- Autumn panel of dried leaves, reeds and berries
- Autumn herbarium within
- Panel on canvas from a frame trimmed with acorn caps
 Dried leaf covered with gold paint in a frame
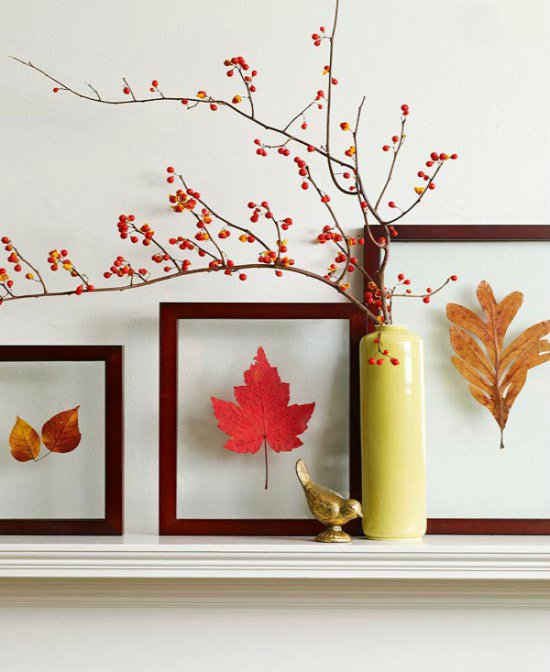 Framed leaves on glass
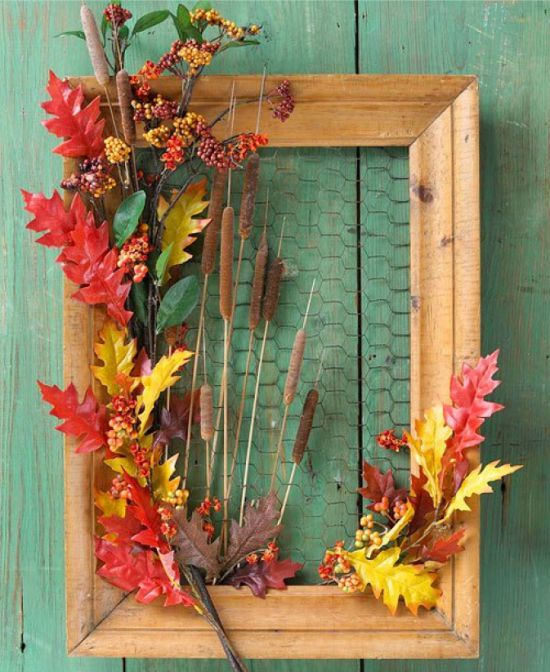 Autumn panel of dried leaves, reeds and berries
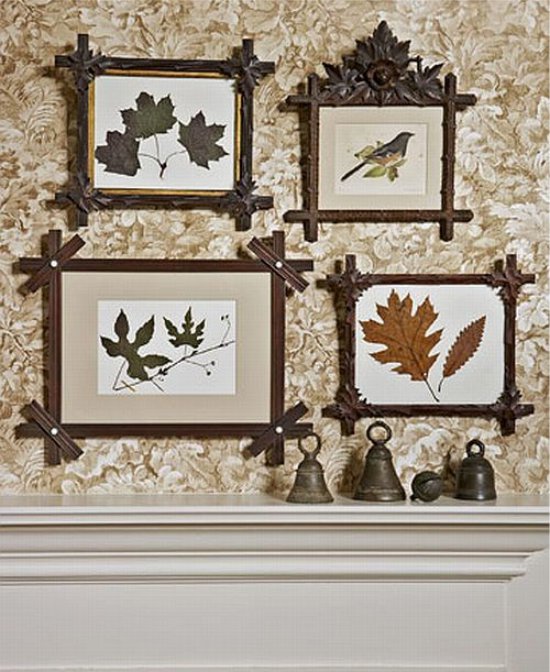 Autumn herbarium within
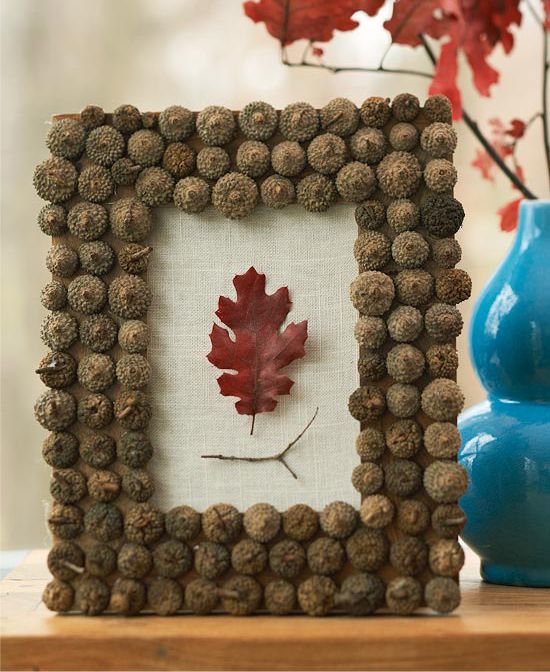 Panel on canvas from a frame trimmed with acorn caps
And finally, we suggest watching a video tutorial on how to make an autumn craft in the form of a panel of leaves with a frame of acorns with your own hands.
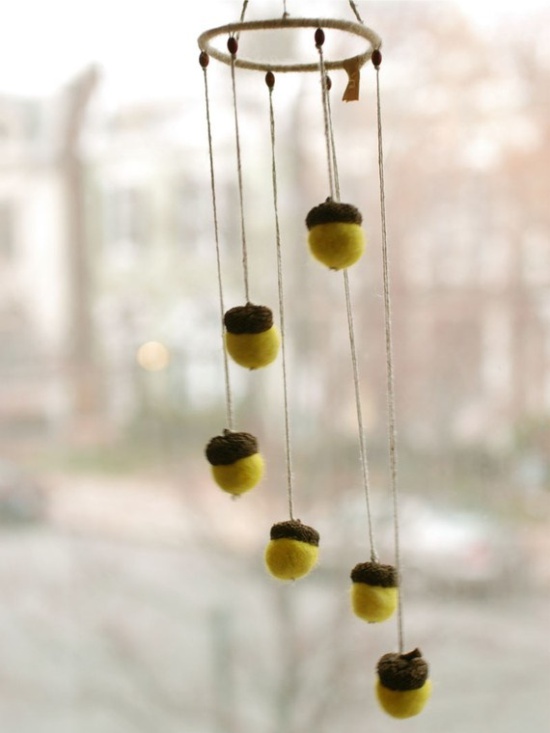
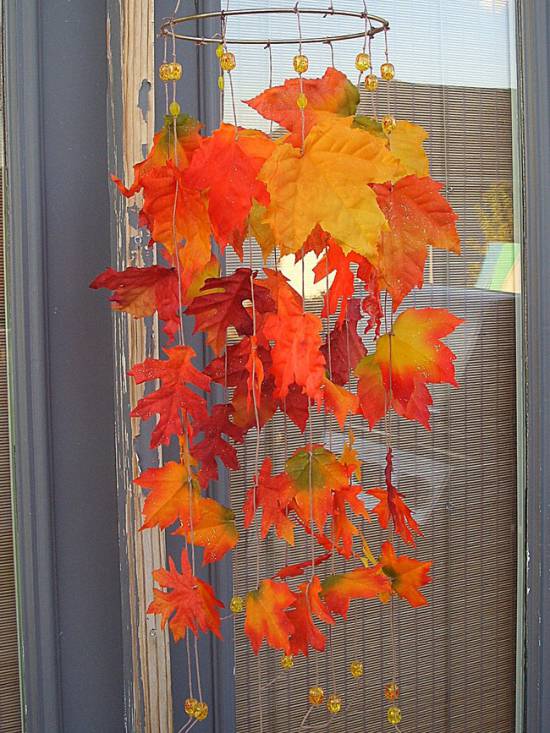
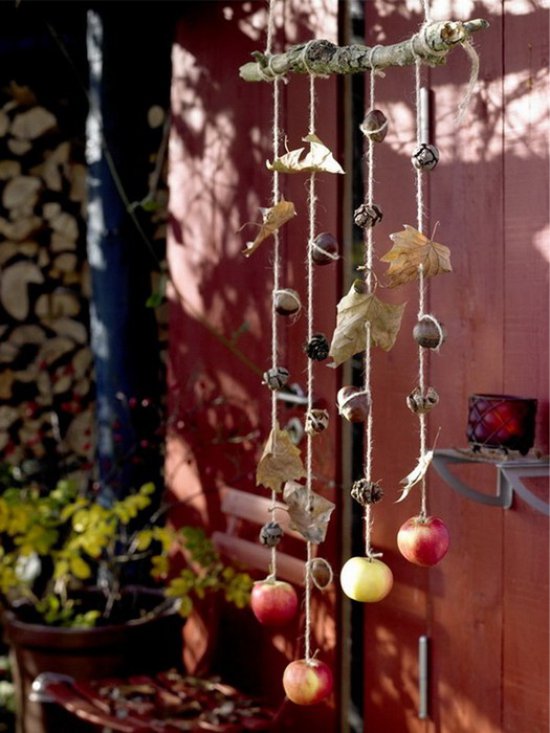
Idea 4. Wind chime from natural materials and not only
The next project is an example of an interesting, but very easy-to-make craft from natural materials and ready-made parts, which a child can make almost independently..
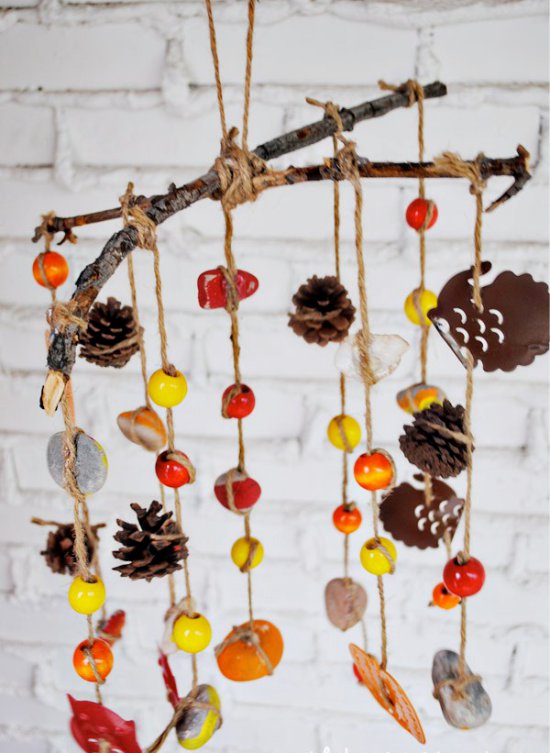
Autumn wind chime
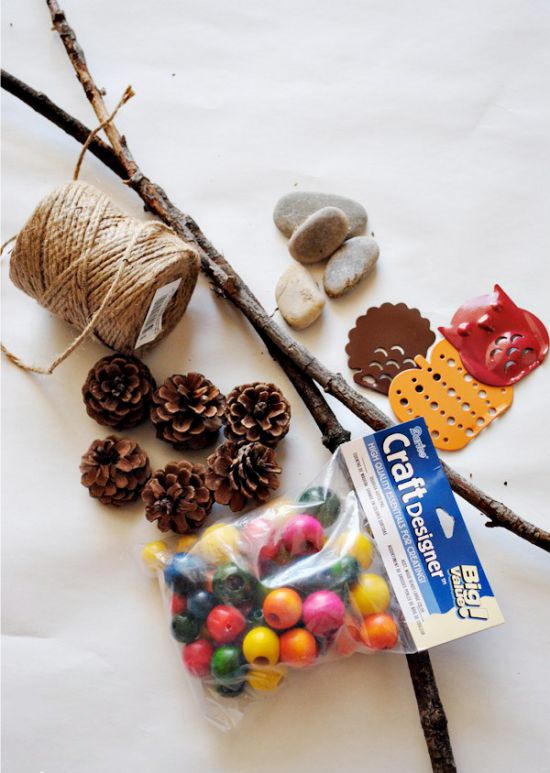
Materials:
- Two or one sticks;
- Natural and manufactured materials for decorating threads: pine cones, flat stones, acorns, wooden beads, small metal candle holders (used in this project) and everything that comes to hand and corresponds to the theme of autumn;
- Leg-split;
- Hot glue gun and glue sticks.
Step 1. Paint some elements of the future wind chime, if necessary. In this master class, the author painted the pebbles in bright yellow and red colors..
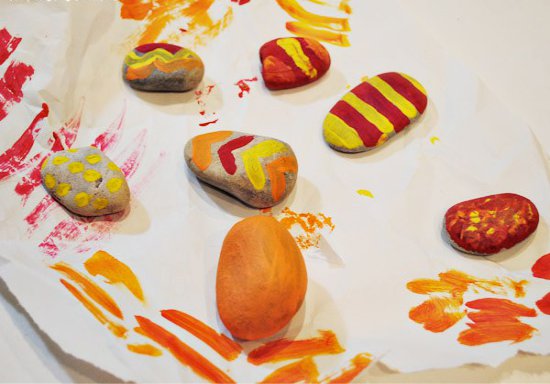
Colored pebbles
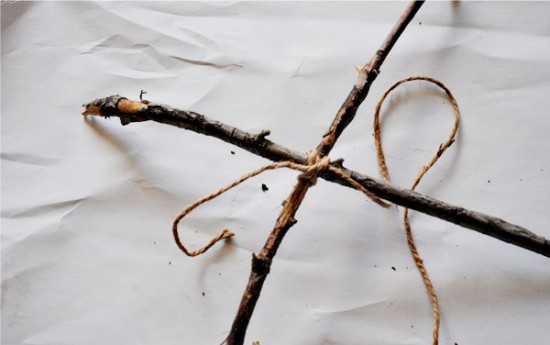
Step 2. While the jewelry is drying, tie two sticks cross-to-cross and tie the center of the cross with twine as shown in the photo below. You can also use just one long stick or, say, a hoop.
Step 3. Cut 9 twine ropes of the desired length with a small margin for knots, so that in the future you get two rows on each branch and one in the middle.
Step 4. To create one row of wind chime, take a piece of twine and start stringing beads or other pieces onto it, passing the ropes through the holes twice or pulling them tightly into knots. The stones should be additionally fixed with hot glue. In order not to be mistaken with the order, the details should first be laid out in the desired order. By the way, it is better to place especially sonorous elements opposite each other so that their chimes in the wind can be heard better..
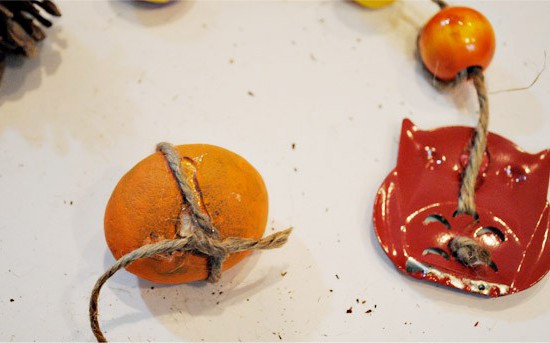
Fastening stones
Forming the wind chimes
Step 5. Tie knots at the end of each string.
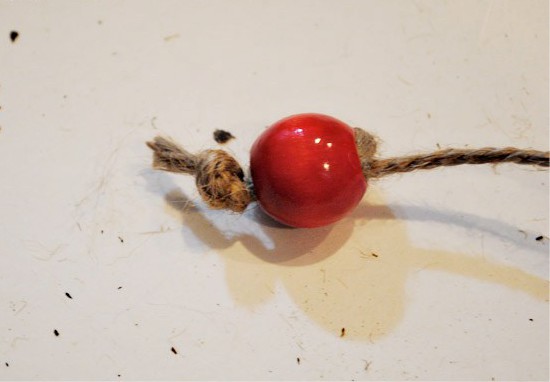
Twine bead and knot
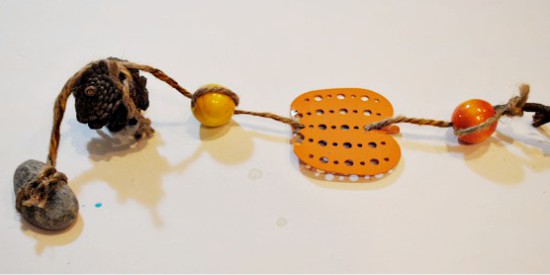
Step 6. After each strand is finished, tie them to the branches in double knots, adding a drop of glue.
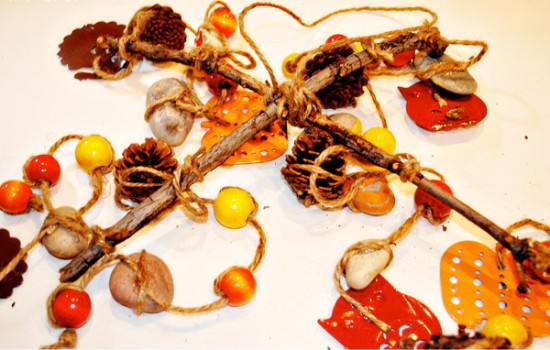
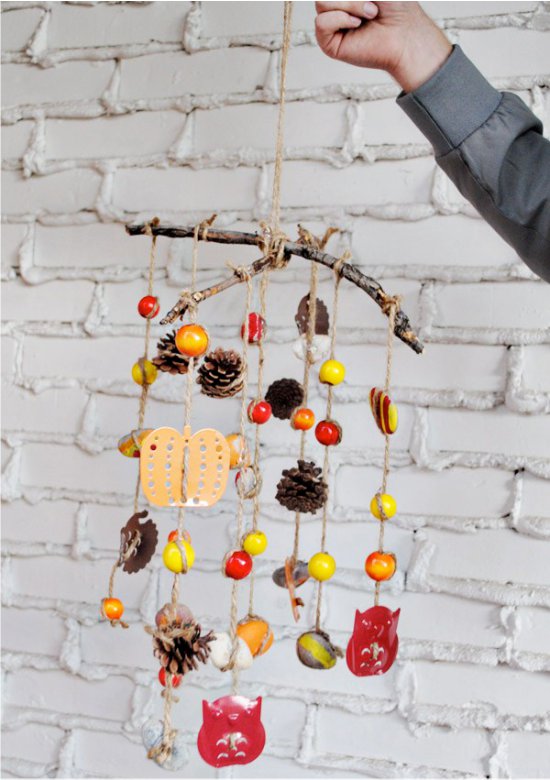
Below are other examples of this unusual decoration made from cones, acorns and leaves..
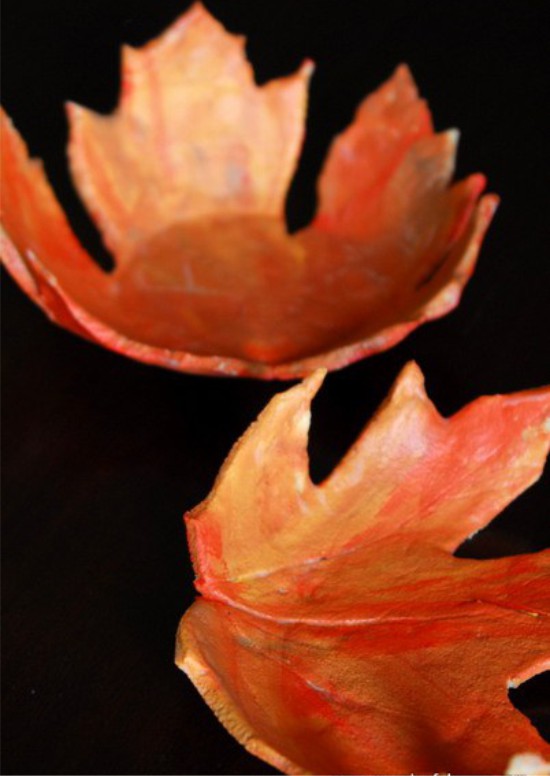
Idea 5. Candlesticks in the form of autumn leaves from salted dough
Leaves can be used not only as a decorative or finishing material, but also simultaneously as a template and a stamp for creating crafts from any mass for modeling. Take note of the idea of autumn crafts with children in the form of such cute leaves of salt dough. By the way, they are not only beautiful in themselves, but can also perform a practical function, for example, you can store various decorations or put candles on them..
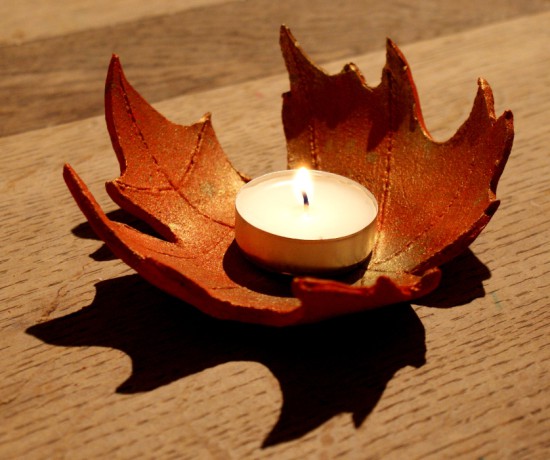
Salted dough candlestick
Materials:
- Ingredients for kneading salted dough: ½ glass of salt, ½ glass of water, 1 glass of flour;
- Capacity for kneading dough;
- Glass bowl;
- Rolling pin;
- Knife;
- Large leaves;
- Vegetable oil;
- Acrylic paints in yellow, red, orange and brown colors.
Instructions:
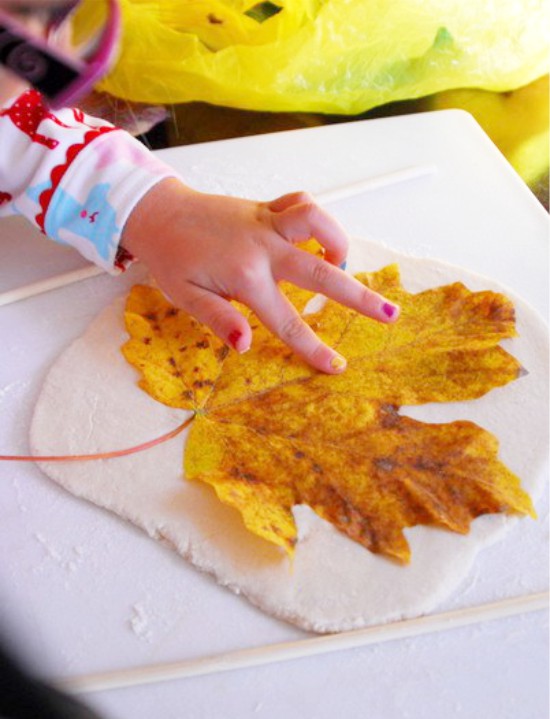
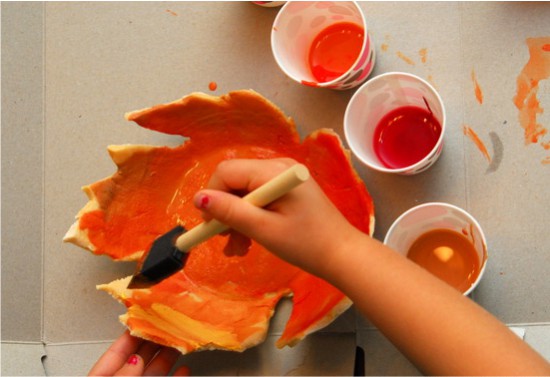
Step 1. The first thing to do is to go for a walk with the whole family and find at least two beautiful large leaves.
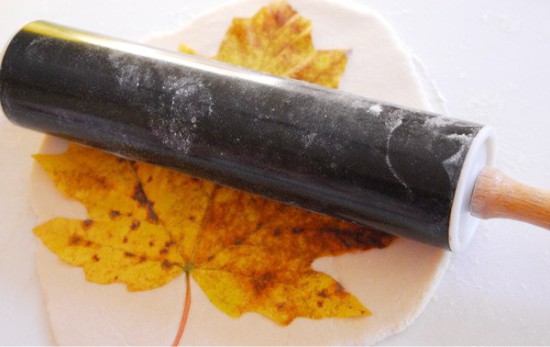
Step 2. Then knead the salted dough. To do this, simply mix all the ingredients and roll out the dough to about 6 mm thick (at least) so that it is not too thick, but also not too brittle..
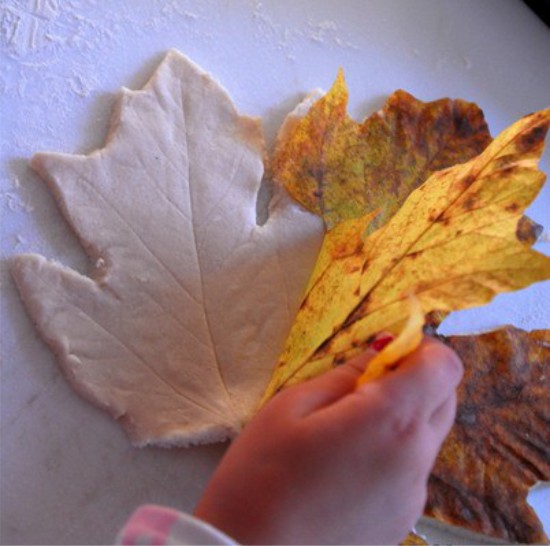
Step 3. Spread your sheets of paper on the dough and go over it with a rolling pin with light pressure.
Step 4. The next step is to cut the shape around the sheet. Use a sharp knife and, of course, take this part of the work yourself..
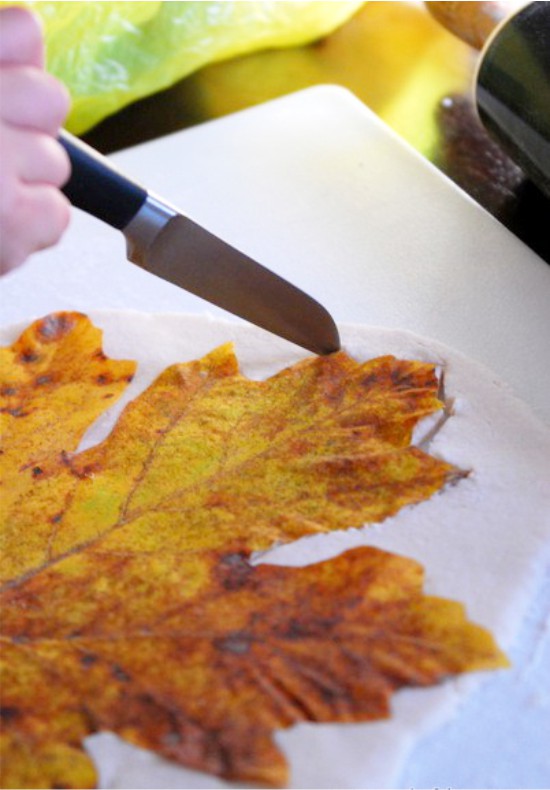
Cutting out the shape
Step 5. Remove the leaves. Turn the glass bowl over and brush it with a thin layer of vegetable oil.
Step 6. Gently lift the sheets and place them on the bowls.
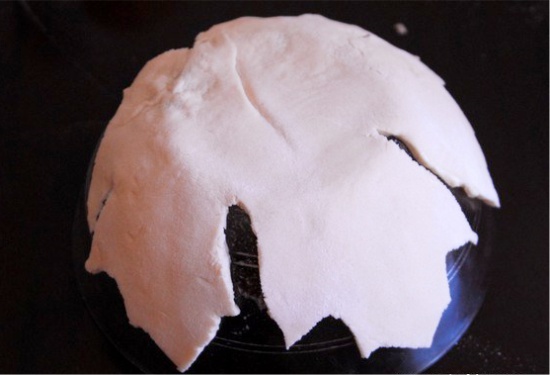
Placing the dough on a buttered bowl
Step 7. Place bowls of dough in an oven preheated to 250 degrees and leave them to bake for 2-3 hours.
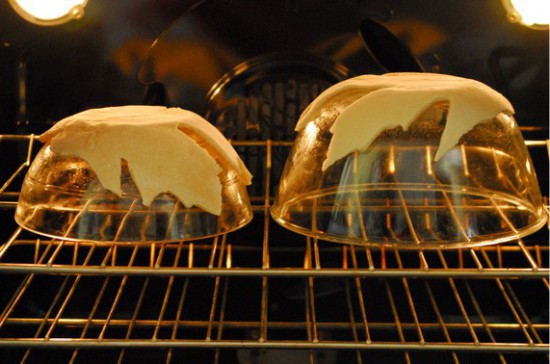
Baking salty dough
Step 8. Take your pieces out of the oven and let them cool without removing from the bowls for about 15 minutes. Then gently lift the leaves and leave to cool completely..
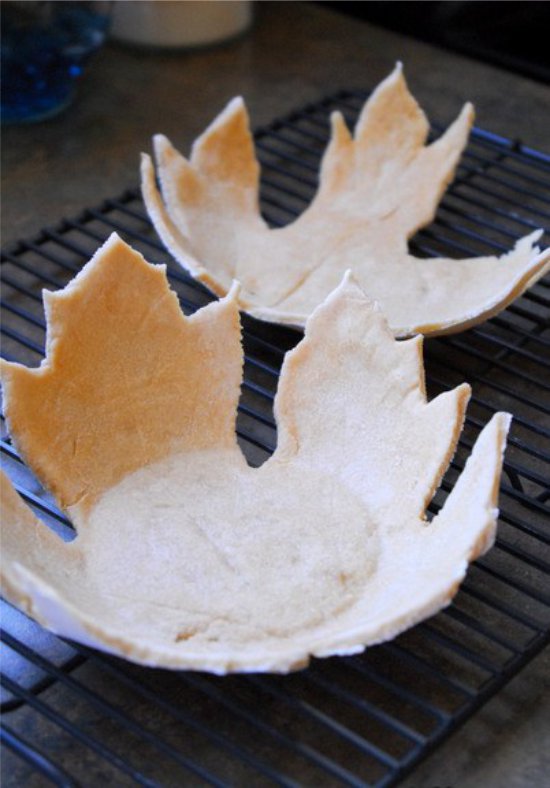
Blanks
Step 9. Once the bowls are cool, start painting. To do this, pour the paints of each color into cups and let the children mix them on their own and paint first the inside of the leaves, and then the outside. Salted dough crafts are rather fragile, so you need to paint them carefully, without pressure. Wait until the paint dries and, if desired, cover the bowls with a layer of PVA glue. It will give the craft a matte finish and make it a little stronger..
Bowl painting
The shapes of the leaves can be different.
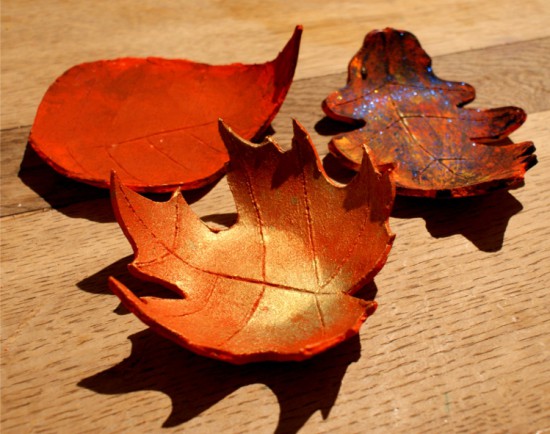
Salted dough leaves
By the way, if you don’t want to mess with salty dough, then you can replace it with soft plasticine. The photo below shows an example of such a craft.

Autumn craft from plasticine
See also the material: How to make a candlestick with your own hands: 70 photos, 7 ideas and master classes.
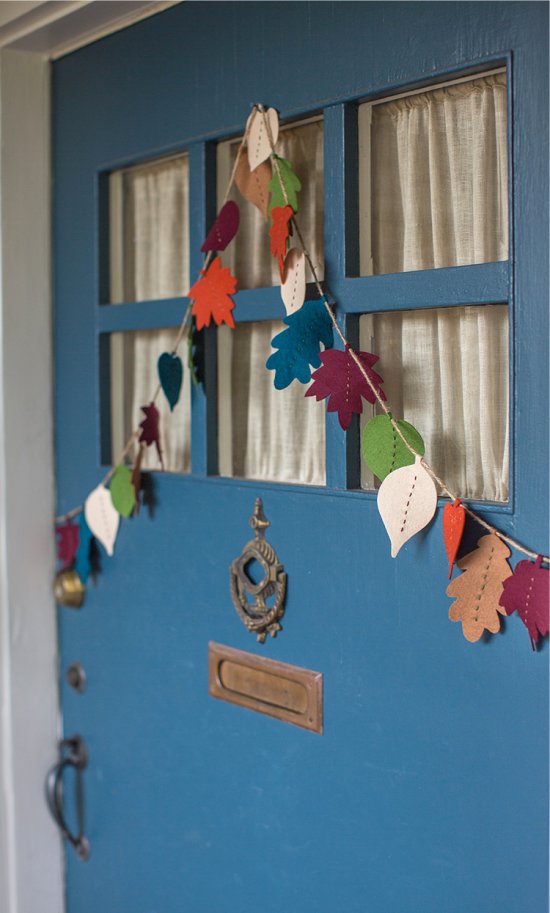
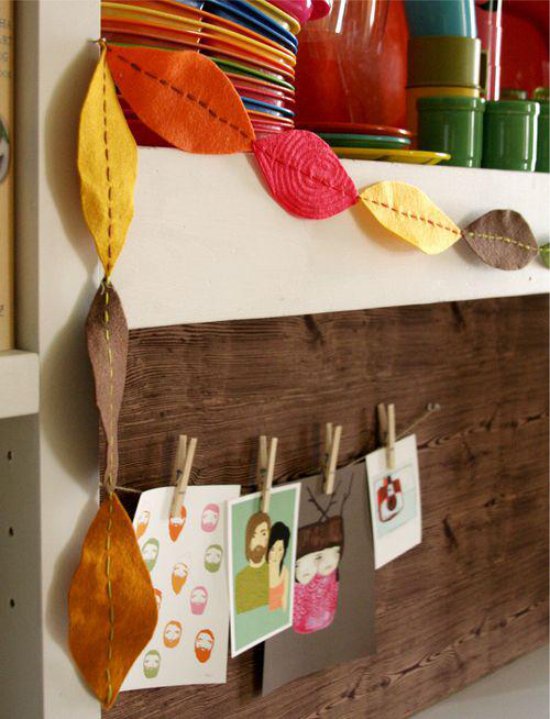
Idea 6. Garland of felt
Felt, although not a natural material, makes the most autumn handicrafts from it. Today we offer you to make the simplest garland of felt leaves.
Materials:
- Several sheets of felt of autumn colors;
- Leg-split;
- Scissors;
- Glue;
- Thick threads with a needle;
- Pencil.
Instructions:
Step 1: Download and print the leaf templates (see the download template below), then cut and outline them.
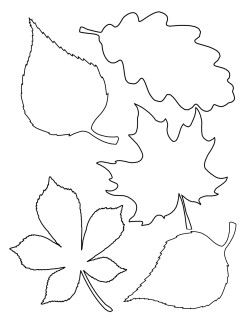
Click to download the template
Step 2. Cut the blanks.
Step 3. Sew the veins manually with large stitches.
Step 4. Now, keeping an equal interval, hang the leaves on the twine. To do this, wrap the tail of each leaf around the twine and fix it with glue. If you wish, you can sew on the details. Woo-ala, the autumn felt garland is ready!
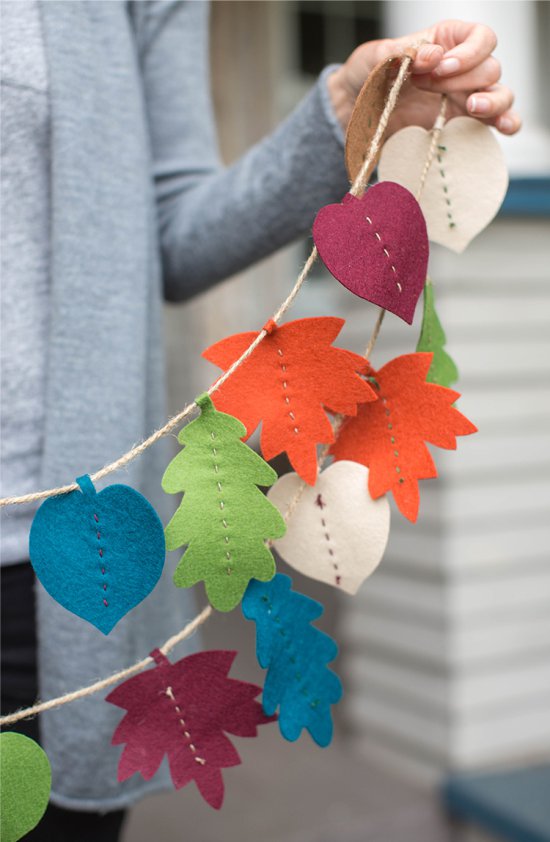
Following the principles of this simple master class, you can create a variety of garlands with decorations in the form of acorns, cones, pumpkins, etc. The following selection of photos shows some examples of autumn felt garlands.
-
 Halloween felt banner
 -
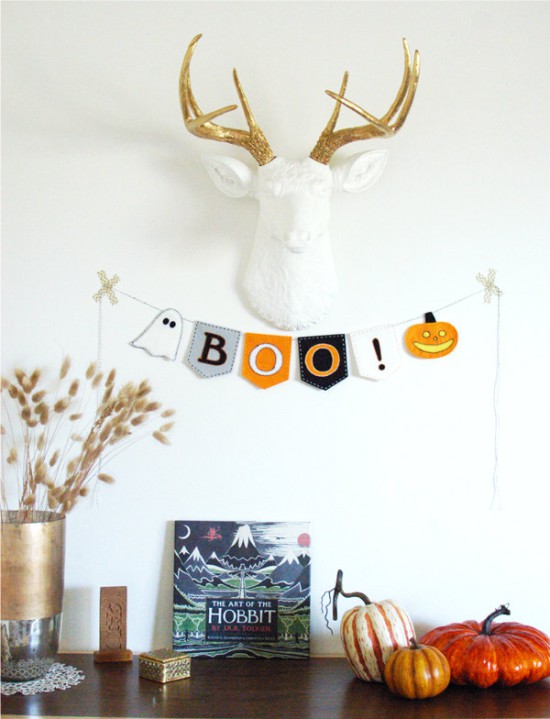 Halloween felt banner
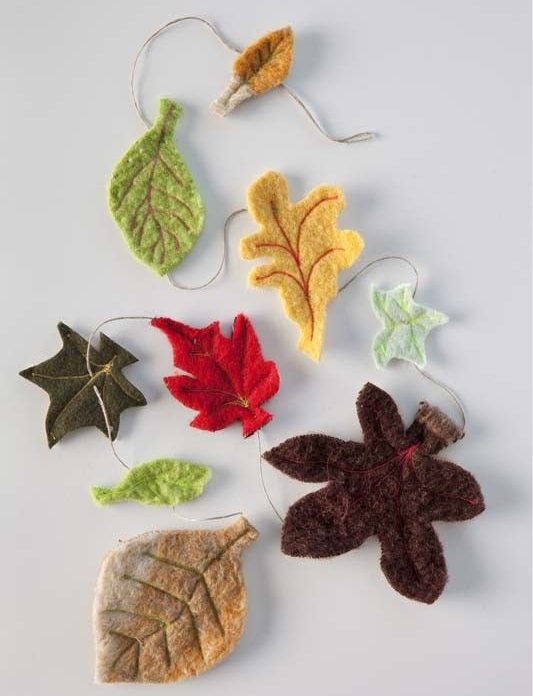
See also the material: How to make a garland with your own hands.
How to dry leaves and flowers
Method 1. This method is suitable if you want to create panels, appliques or other non-volume crafts. Place the sheets or flowers between the pages of the book at a distance of about 3 mm from each other and transfer them to other pages every day (also observing the interval of 3 mm). Within a week, the paper will absorb all the moisture from the plants, and you can use them for creativity..
Method 2. If your craft does not involve the use of flat leaves, then you can dry them by simply bundling them up and hanging them upside down in a dry but ventilated area. At the same time, keep in mind that from the sun’s rays the leaves will lose their color completely, and in the shade they will retain.
Method 3. This method is suitable for drying and preserving the color of leaves and cornflowers. Blot fresh, freshly plucked leaves / cornflowers with a napkin if they are wet. Place each sheet between two layers of waxed paper and place a paper towel on top of the sandwich. Preheat the iron and make sure the steaming mode is off. Press the iron on a paper towel for 2-5 minutes. Flip the “sandwich” over and iron it again through a paper towel, then carefully remove the waxed paper.
- To prevent dried leaves and flowers from breaking, they must be dipped in a solution of water and PVA glue, diluted in a 4: 1 ratio, and then left to dry..